Partition Disk In Wndows 7
Windows 7 has a built-in facility to create, resize and delete partitions from a HDD, which means you can shrink or extend the partitions.
The Disk Management utility enables you to shrink and expand partitions and it does not require any 3rd party utilities.
This step-by-step tutorial helps you create, resize or delete a partition in Windows 7.
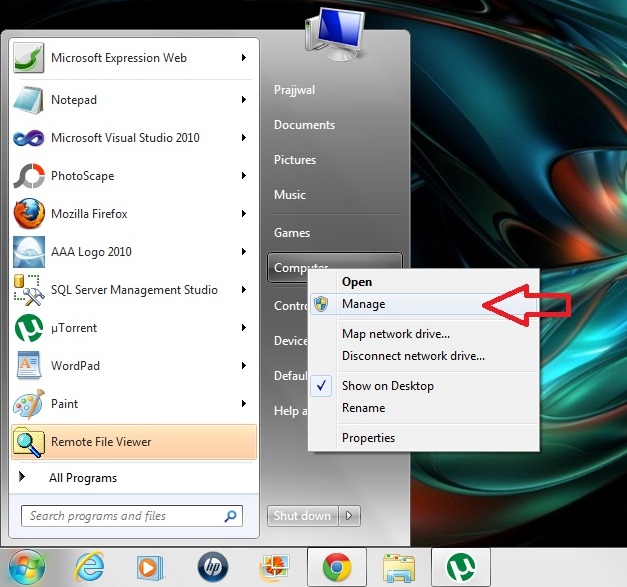
1. Go to Start -> Right Click on Computer -> Manage
2. Computer Management windows will open. Click on Storage -> Disk management

3. Select the Drive you want to partition.

4.Now You Can partition in 2 ways.
4.1. Right click on the drive and click on Shrink Partition.

or
4.2. Right Click on the graphical representation of your drive that you want to partition.

5. Please wait for some time ..approx 2 minutes .. It takes some time to calculate the available disk space on your system and how much of the space you can use to create another drive. After some time a dialogue box will appear which indicates the Size of the drive in MBs.(remember 1024 MBs = 1GB)and the total amount available to Shrink. Enter in the amount you would like to shrink,you can use a calculator for this i.e. If you want to make a disk drive of 40GB multiply 40 X 1024 = 40960 MB.. So Enter 40960 in the box which says:"Enter the amount of space to shrink in MB", The value that you enter here should be lesser than the number in the grayed out box right above it i.e "Size of available shrink space in MB:" .This will be the size of the new partition.


7. Follow the Wizard that appears and fill in the Size of the Partition. Normally the size to fill in is the size you just shrunk the drive by.

11. Enjoy! You would see a new disk on the My Computer window.
There is another way that I just came to know about: http://h30434.www3.hp.com/t5/Other-Notebook-PC-Questions/How-to-repartition-HDD-of-HP-notebook-with-pre-loaded-Windows-7/m-p/742019
It has been written by Daniel potyrala..
The Disk Management utility enables you to shrink and expand partitions and it does not require any 3rd party utilities.
This step-by-step tutorial helps you create, resize or delete a partition in Windows 7.
1. Go to Start -> Right Click on Computer -> Manage

2. Computer Management windows will open. Click on Storage -> Disk management

3. Select the Drive you want to partition.

4.Now You Can partition in 2 ways.
4.1. Right click on the drive and click on Shrink Partition.

or
4.2. Right Click on the graphical representation of your drive that you want to partition.

5. Please wait for some time ..approx 2 minutes .. It takes some time to calculate the available disk space on your system and how much of the space you can use to create another drive. After some time a dialogue box will appear which indicates the Size of the drive in MBs.(remember 1024 MBs = 1GB)and the total amount available to Shrink. Enter in the amount you would like to shrink,you can use a calculator for this i.e. If you want to make a disk drive of 40GB multiply 40 X 1024 = 40960 MB.. So Enter 40960 in the box which says:"Enter the amount of space to shrink in MB", The value that you enter here should be lesser than the number in the grayed out box right above it i.e "Size of available shrink space in MB:" .This will be the size of the new partition.

6. Now Click on Shrink and wait for the some time for the process to complete. The time to shrink the volume depends on the size of the drive and the amount that you are shrinking.(SHRINKING: It simply mean pushing you data to one corner of the disk so that you get some free disk space that will contain no data and you can separate.) Depending on the size of the drive and amount to shrink this could take a while. Once completed, you would see an unallocated space at the graphical area on the lower part of Computer Management window,which is the size you just shrunk the volume . Select it and right click and then select New Simple Volume.

8. Assign a drive letter, pick one of your choice as it doesn’t make a difference.
9. You can name the Volume label as anything you wish. You can even change it later.
10. Then on the Format page, Ensure NTFS is selected and then enter a name for your drive and click Nextfollowed by Finish

There is another way that I just came to know about: http://h30434.www3.hp.com/t5/Other-Notebook-PC-Questions/How-to-repartition-HDD-of-HP-notebook-with-pre-loaded-Windows-7/m-p/742019
It has been written by Daniel potyrala..


Comments
Post a Comment